The average person has at least two email accounts, and many more people have even more than that. Even one email address can be difficult to manage sometimes, let alone multiple. Given this, how do you manage receiving emails on multiple accounts? Most people constantly switch back and forth between various inboxes, which can increase the confusion. While this can work for some, it's difficult to manage for others and often causes issues eventually with regards to organization and time management. One common solution to this is to opt to receive all of their emails in the same account.
One potential solution to this problem, and more, is by automatically forwarding emails to a single inbox, which Gmail allows you to do. In this article, we'll talk a little more about why you might want to do this, how to start forwarding all of your emails, and more.
Reasons to Forward All Emails
There are quite a few reasons you might want to forward all of the emails in your inbox, some of which we already mentioned. Here are just a few more reasons:
Changing your name/provider
There are a number of reasons why you might want to change your actual email address. Maybe you outgrew the username you chose when you were 12 years old? Maybe you got married and changed your last name? Maybe you decided to switch to the newest email provider that all the cool kids are using?
Regardless of the reason you want to change your address, you wouldn't want to lose out on all of the emails your account will still get. After years of signing up for websites with a certain email address, you're certainly likely to forget to change over the email for a given site, which could cause you to lose access to that site. By forwarding all emails from your old account, you can still access password recovery emails and other important communication.
Changing jobs
The average person is staying at their jobs for less time these days, which means you're likely to be changing email addresses more often. In order to avoid losing communication with professional contacts, your employer may allow you to forward your emails to your personal email address in order to keep read-only access. While this may only work on a company-by-company basis, it can be a big help to not lose emails from your old work email accounts.
Spam
Spam is an unfortunate byproduct of tools like email. We've seen time and time again at Block Sender that people are fed up with the amount of spam they receive on a daily basis, with many customers stating that they're at the point where they want to just switch emails to get away from all the spam. If this is you, we'd suggest signing up for Block Sender first 😉
Regardless, you may still want to ditch a spam-filled email and just move on. In cases like these, you wouldn't want to forward all emails, otherwise you'd just be forwarding the spam as well. Instead, you would want to forward the select few that matter to you. To do this, follow the last section of this article, "How to Stop Forwarding All Emails" for all important contacts that use your email address.
Organization
Along the same veins as the intro to this article, many people have more than one email address, which can become difficult to manage and organize. Instead of switching between inboxes, you could forward all emails to one inbox, making it easier for you to go through all of the emails you receive on a daily basis.
How to Forward All Emails in Gmail
To get started with forwarding all of our emails, we need to go and configure the feature in our Settings. We'll do this by clicking on the gear icon in the upper left-hand corner of the screen:

Note: Auto-forwarding of emails can only be set using the web version of Gmail.
From there, you'll see a button that says "See all settings". Click that button.

You should now see the Settings page with a number of tabs at the top. Click on the "Forwarding and POP/IMAP" tab, which should then reveal the "Forwarding" settings.

Here you can see whether or not you have email forwarding enabled, as well as which email addresses you're allowed to forward to. Assuming you haven't used this before, we'll need to authorize an account to forward to with Gmail. To do this, click on the "Add a forwarding address" button. This should bring up a modal in which you'll type the email address you want to authorize:

Once you've entered your forwarding email, click "Next". After clicking "Next", a confirmation dialog will come up to confirm the address. Click "Proceed":

After confirming the address, you should see another dialog informing you that a confirmation code has been sent to the forwarding address.

Go to that email and find Gmail's confirmation email they sent you. It may take a minute or two to show up in your inbox. Once you've received it, open it and click the link as instructed in the email:

After clicking the link, Gmail will again ask you if you want emails from the original address to be forwarded to this second address. Click "Confirm".

Once this is done, go back to the original email account and refresh your settings page. You should now see the new forwarding email available in the dropdown list next to the text "Forward a copy of incoming mail to". Click the dropdown and select the newly connected email if it's not already selected. Also, make sure the radio button next to "Forward a copy of incoming mail to" is selected.

After you've selected the appropriate forwarding email, go to the bottom of the page and click "Save Changes". Congratulations! Gmail will now forward all of your emails to this new email address.
What Happens to Original Emails After They're Forwarded
In Gmail, you can choose whether to keep or discard the original emails after they're forwarded to another email address. By default, Gmail keeps a copy of the original email in the inbox. However, you can change this setting according to your preference.
Here is the list of available options:
- Keep Gmail's copy in the inbox (Default)
- Mark Gmail's copy as read
- Archive Gmail's copy
- Delete Gmail's copy

Be careful while choosing the delete option. If the forwarded email cannot be delivered due to some reason, you'll also end up losing the original email after 30 days.
How to Label Forwarded Emails
Gmail labels are a great way to organize emails. You can label the incoming forwarded emails and color-code them to visually separate them from the rest of your emails.
Here's how you can easily label forwarded emails in Gmail:
- Click on the "Show search options" icon.

-
Type the original email address (the one forwarding the emails) in the From field.
-
Click "Create filter".

-
Select the "Apply label" option and create a new label.
-
Lastly, click "Create filter".

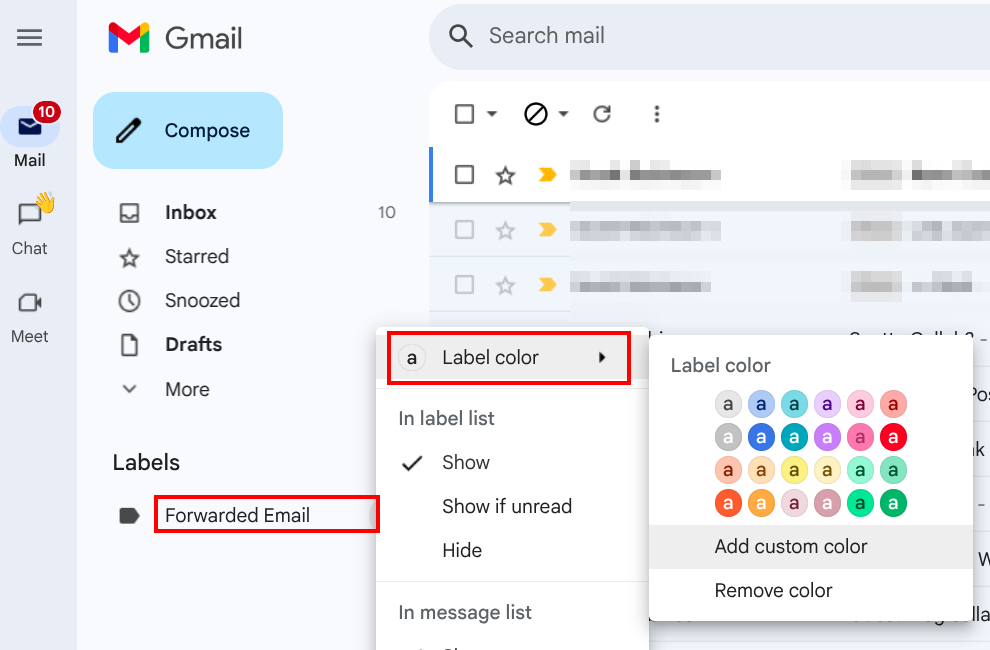
Next, access the labels from the left menu and select a color for the newly created label.
How to Stop Forwarding All Emails
For one reason or another, you may want to stop forwarding all of your emails. For example, after a sufficient amount of time maybe you stopped getting important emails at your old address, in which case there's no reason to then be forwarding emails from that address. In order to stop forwarding emails, all you need to do is follow a few steps.
First, make sure you're logged in to the correct account. You'll want to find the account that is actually forwarding the emails.
Like we did before, open your Settings page in Gmail and click on the "Forwarding and POP/IMAP" tab. Once there, under the "Forwarding" section, click on the "Disable forwarding" radio button:

Then click "Save Changes" at the bottom of the page and you're done! No more emails will be forwarded from this email address.
Forward Only Specific Emails
For more specific use-cases, we can set up Gmail to forward only certain emails to an account, as opposed to forwarding all emails. This is useful for a number of reasons, like when you only want to automatically forward emails from certain people. For example, let's say your email account was really only ever used to communicate with a few coworkers on a project, but not really much else. If the project ends and you no longer need the email, you could set up forwarding for just those coworkers' emails. This way you won't also get the spam that inevitably comes into this inbox.
For cases like these, we can use Gmail's filters to set up the forwarding. In this section we'll detail the steps you need to follow to forward just these emails.
Note: There are a number of ways to create filters in Gmail, and we won't cover all of the ways here. Keep in mind that this is only one way to go about this process.
Start by finding an email from someone in which you want their emails to be forwarded. Open the email, click the three vertical dots icon, and find the option that says "Filter messages like this":

Click that option. You'll then see a menu pop up allowing you to create a new filter, which is pre-populated with the sender's email address at the top. From here, click "Create filter".

Next you'll be asked what you want to do with emails that match the criteria set previously. We'll want to select the option that says "Forward it to", and then select the appropriate forwarding email from the dropdown list:

Note: You will need to have already linked a forwarding email before you get to this step. In order to see how to do this, be sure to follow the appropriate steps in the above section, "How to Forward All Emails in Gmail".
Once you've selected the forwarding destination, click "Create filter", and you're done! All emails from this sender will now automatically be forwarded to the account you selected.
Repeat this process for all senders you want forwarded. Keep in mind that since you're using filters, you can also use any of the other criteria to specify which emails should be forwarded, like keywords, phrases, subject lines, etc.
