Overview
Gmail has been a significant mailing system that provides users with a swift, reliable, and hassle-free mailing experience. As Gmail is sticking to its goals of ensuring that every user gets their productivity at a top-notch level using Gmail, many new functionalities are included in its services.
Gmail can give you the freedom to customize how you label your emails so that it benefits your workflow and productivity. This is an excellent addition to what you can do to ensure that you maximize Gmail. This will be a guide to help you know all about organizing emails with folders in Gmail. Plus, you will get some bonus information on how it works, their advantages, and tips to make this customization work for your needs.
What are Gmail Folders
Gmail folders, which they actually refer to as "labels", are a way to categorize your inbox. Essentially, while named differently, these are much like folders that put your desired tag on emails. Gmail labels are unique to other email providers' usual folder and subfolder features. One of their main advantages is that you can apply multiple labels to a single email, whereas with folders you can only put an email in a single folder. This is why it can be slightly confusing for a new user. However, this results in better control over the organization of your inbox.
Next we'll describe more about the various ways to organize emails in Gmail.
Understanding How Gmail Works
Labels
It was noted that Gmail designs its features a bit differently from other email providers. The Gmail label is similar to sticking a sticky note to a paper. By looking at the label, you can put whatever note or text you want so that you can quickly figure out what that email is. And Gmail allows you to put as many labels as you want per email.
Folders
Gmail also has a feature allowing you to view all your emails under a particular label, which is similar to the classic folder structure. You can also use the label to add or move it to other folders easily. The Gmail labels are sometimes called folders as they can refer to the same thing, especially in the underlying email protocols, like IMAP.
Tabs
Gmail also has the concept of tabs. You can use these categories to separate your emails so that you can focus on what you want to see. By default, emails are already classified under the "Primary", "Social", or "Promotions" tabs. Although there are other types of categories you can enable, like "Updates" and "Forums". The tabs/categories feature in Gmail is yet another useful system that helps you to both automatically classify and separate incoming emails.
Advantages of using Gmail Labels
Using Gmail labels is essential in boosting your productivity because of the loads of benefits they provide. And these are features that are beginner-friendly, so you do not need to be a tech pro to make use of this feature.
First, how do Gmail labels improve productivity? Applying labels to the emails you want to keep will make it far easier for you to search for a given email later down the road. Most of us don't fully remember every email we receive, so we need another way to narrow down the list of emails to look through. It may not be evident now, but this will cut down a lot of your time in the future when you go searching for emails in your inbox.
You're also less likely to miss out on important emails, especially if you take advantage of filters that automatically apply labels for you. While Gmail can sometimes correctly classify "important" emails for you, a more guaranteed way of finding emails from important contacts is to have a filter apply a label every time a certain address emails you.
Lastly, Gmail labels can streamline your work and help you build a more attractive and functional inbox. Not only can you create labels with your own custom text, but you can also give them colors, making it even easier to quickly identify emails from certain labels/categories.
Filtering with Labels
While Gmail can apply labels for you via filters, oftentimes you'll need to apply the labels yourself as you go through your inbox. If, over time, you can be consistent with this process, you'll not only find yourself with a much more organized inbox, but a much easier one to search through.
Gmail's search feature works fairly well if you know what unique keywords to search for in order to find a given email. But it's not always that easy. If you don't remember much about the contents or sender, then you may just need to search through a list of emails. In order to better filter that list down to fewer choices, you can filter by label, saving you quite a bit of emails to go through and, more importantly, time.
Creating Gmail Labels
There are numerous ways to create labels in Gmail, and all are pretty straightforward.
Follow these instructions to both create and apply a label:
- In your Gmail inbox, select at least one email that you want to label. Click the checkbox to the left of the chosen email.

- Click on the label icon at the top of the inbox. A prompt will open.
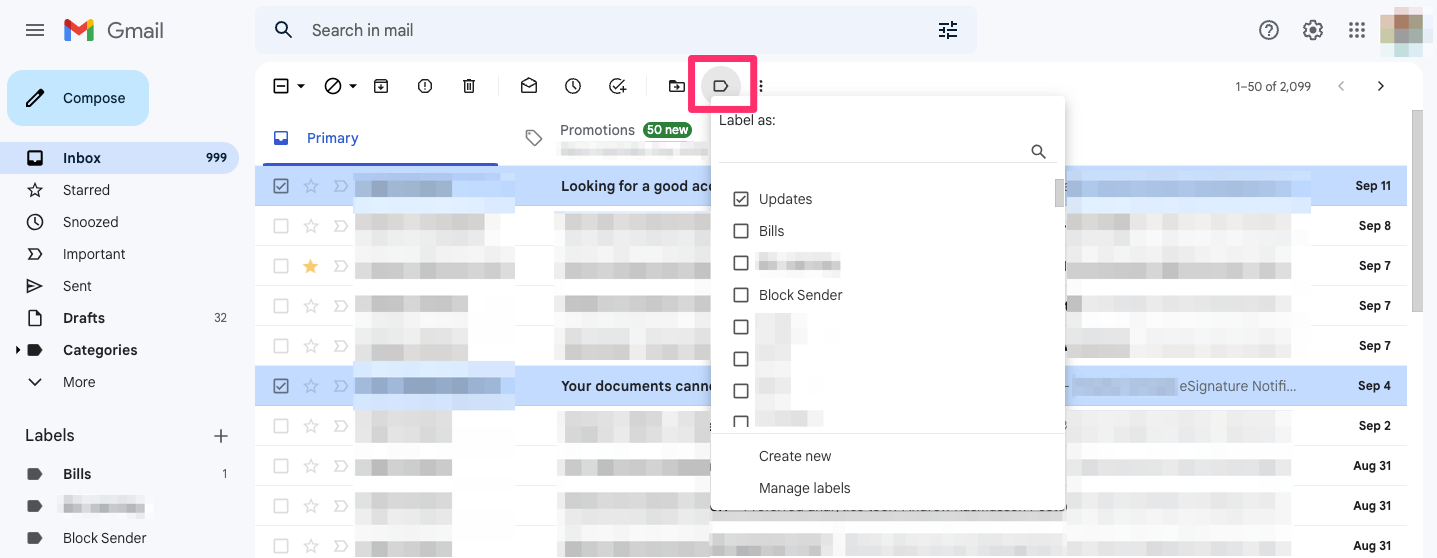
- Enter your desired label name in the input box below "Label as:" and click on "[YOUR LABEL] (create new)".

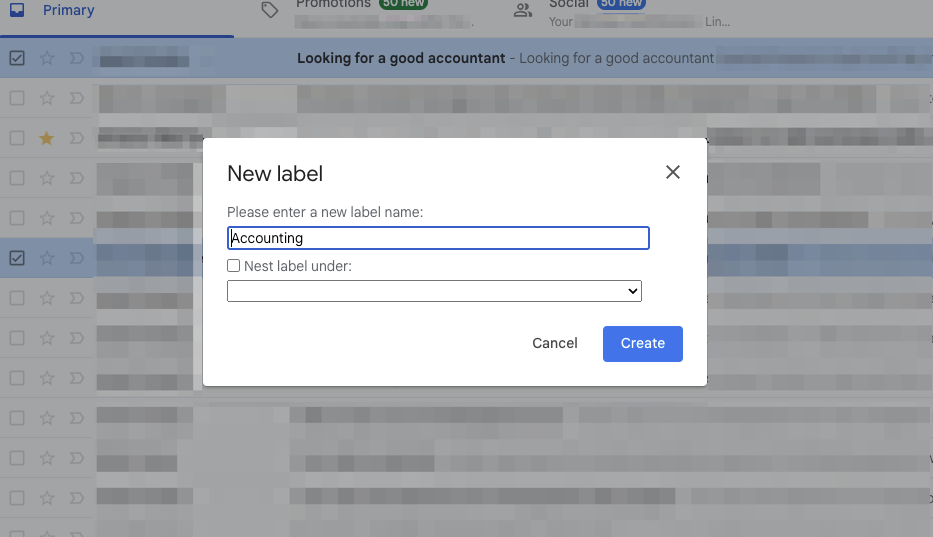
- A dialog box will pop up to help you finish creating your label. If you want to make this a nested label, choose the label to nest it under. Once you've chosen a label to nest it under, if any, click "Create".
If you simply want to create a label but not yet apply it to an email, do the following:
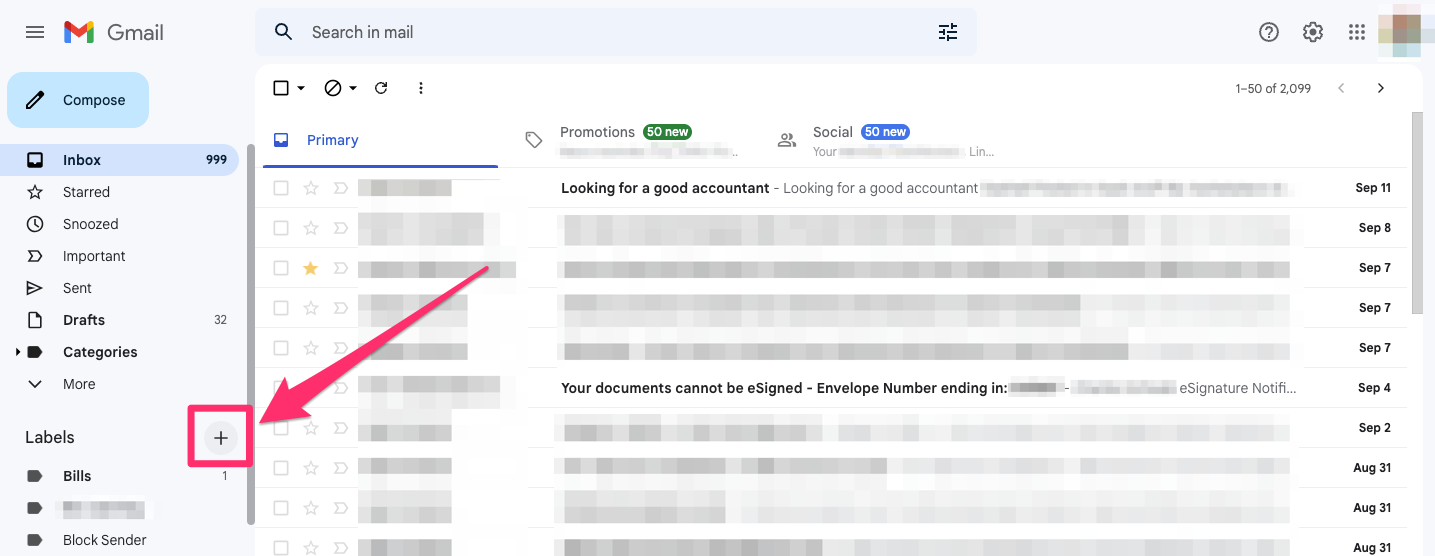
- On the left-hand side of your inbox, click the "+" icon next to the "Labels" menu.
- Enter your label name.
- Optionally select which label to nest it under.
- Click "Create".
Organizing Emails using Folders/Labels
Here are a few more rundowns on what else you can do with labels when using Gmail. These will be helpful in keeping you knowledgeable on the features of the Gmail labels so you can make the most out of their features.
Assigning a Label Color
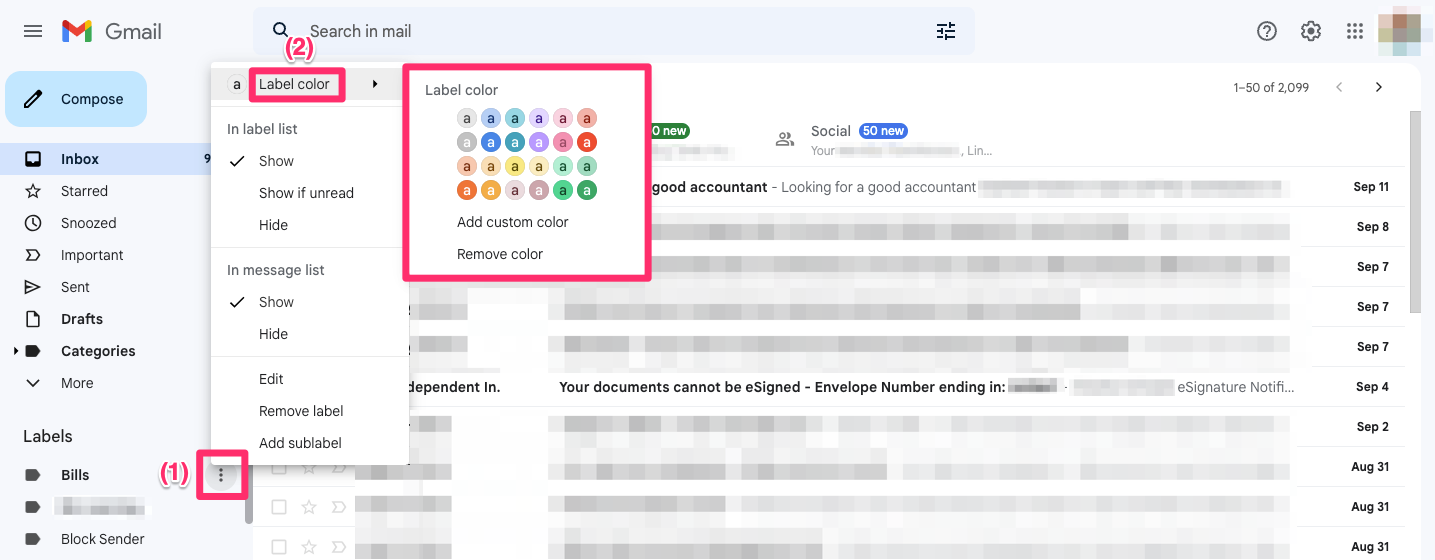
- In the list of labels on the left-hand side of your inbox, hover over your label and click the "three vertical dots" icon.

- Hover your mouse over the "Label color" option and select the color you wish to choose, or select a custom color.
Editing or Removing Labels
- Click "Settings" and select "See all settings".
- On the "labels" tab, choose the "labels section".
- You can edit the label by clicking on the label name and entering a new name on the field.
- Similarly, you can delete a label by clicking the corresponding "remove" buttons in the actions tab. Then, click "delete".
Adding Labels to Emails
- You can simply add labels to email by ticking on the box adjacent to the email that you want.
- Click on the labels tab and choose the existing label that you want to put on the email.
Automatically Labeling Incoming Emails
By utilizing Gmail's filters, you can automatically label incoming emails. This can be a huge help, especially when you already receive a lot of emails, making it difficult to manually label all of the important ones you want to keep.
- Start by clicking on the "Show search options" icon to the right of the search box at the top of the inbox.
- Enter any search criteria that match specific messages. For example, here you can put specific email addresses to label their incoming emails for you.
- Choose "Create filter" at the bottom of the search window.
- Click on the dropdown next to "Apply the label" and choose the label you want applied.
- Finally, click "Create filter".
Tips for Organizing Emails Using Gmail Labels
Gmail labels sure are a wonderful feature to get used to. However, you can get more disadvantages if you do not know how to maximize it. So here are some tips that you will find useful.
While Gmail labels are a great tool for organization, you still need to take care to make sure you're using them correctly and in a way that actually helps you when you need them. Here are a few tips for maximizing the use of folders/labels in Gmail.
Structure and Color Your Labels
Planning out and implementing a well-thought-out structure for your folders in the beginning is very important. You can only imagine how much time it would take you to restructure your labels and re-label all of the emails in your inbox.
Also, color-coding your labels may just sound like a cosmetic to make your inbox look nicer. But don't underestimate how much it can help to be able to quickly identify an email with a visual cue via the label color.
Making the Most Out of Filters
As we mentioned earlier, Gmail's filters can help apply labels automatically. Taking the time to set up these filters will pay dividends for years. The more you're able to automate tedious tasks, like applying labels, the more likely you are to succeed in staying organized and saving time in the long run.
Choosing a Gmail Layout
Labels allow you to organize and filter emails easily, but they won't necessarily optimize your actual inbox. Gmail has other options in the Settings -> Inbox page that can change which emails are shown first. You can choose to show emails by "Important first", "Unread first", "Starred first", and more.
Gmail also allows you to customize which tabs you see, which are like "automated labels" provided by Gmail. Utilize these to help filter out unwanted emails that you'd probably just delete anyway.
