At some point as a Gmail user, or with any email client really, you've experienced how overwhelming managing your inbox can be. And if you've moved from or are used to applications like Outlook or Thunderbird, getting used to Gmail can be kind of tricky.
One of the most common teething problems users experience is related to sorting emails. Unlike Outlook and other email applications, Gmail doesn't offer folders that you can create to sort your emails. You get Labels.
Labels are almost the equivalent of folders in Outlook, but there's a little more to how they work. In this blog post, we'll cover all you need to know about Gmail Labels.
So, if you've played with or tested them and felt a little lost, keep reading. We'll share how to use them like a pro to make your Gmail experience more rewarding.
What is a Gmail Label?
It's a way to tag different emails you receive, making it easier to group emails for easy retrieval.
How do they work?
Contrary to what most people believe, labels differ from folders in Outlook. Outlook folders can be deleted along with all emails in a folder. On the other hand, when you delete a label in Gmail, the emails associated with the label remain in your inbox. They simply lose the label.
Unlike folders in email applications, you can also assign more than one label to an email. This makes referencing emails associated with a certain topic really easy.
Throughout the rest of this article, we'll show you how to create, use, and manage your labels in Gmail.
- How to Create a Label
- How to Assign Labels to Emails
- How to Move Emails to Labels
- How to Read Emails Associated with a Label
- Managing Your Labels
- Changing Label Names
- Removing Labels
- Color Coding Your Labels
- Hiding and Showing Labels
- Using Filters
How to Create a Label
Labels are easy to create. In fact, there are three different ways you can create labels.
Option 1:
Go to your inbox left-hand menu and click on More to expand a list of folders.

At the bottom of the list, click on Create new label.

Next, enter the name of your new label and click on the Create button.

Option 2:
The second way to create a label is by using the label icon in the menu bar.

Select the checkbox of the email for which you'd like to create a label. Next, click on the label icon and then click Create new.
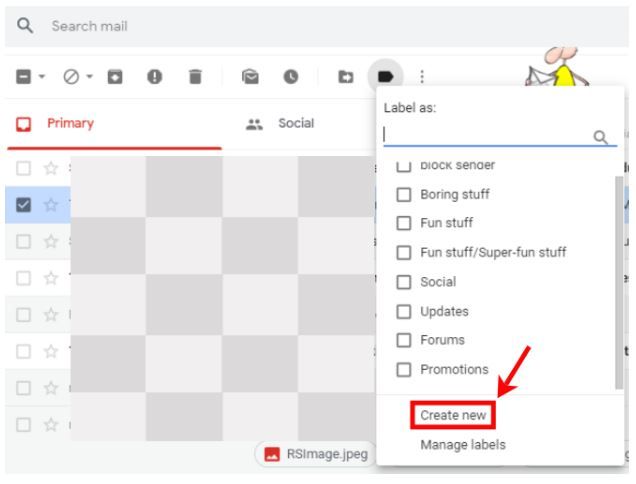
Enter the name of your new label and click on the Create button.
Note: The email you've selected at the beginning of the process will be added to your newly created label.

Option 3:
Right-click on the email you'd like to label and click on Label as. Next, click on Create new.

Enter the name of your new label and click on the Create button.

Note: The email you've selected at the beginning of the process will be added to your newly created label.
New labels will appear in all three areas where you've created them.
How to Assign Labels to Emails
There are three ways to add labels to emails.
Option 1:
Right-click on the email you'd like to label. Go to Label as and select the label you'd like to assign to your email.

Option 2:
From within your inbox, click on and open the email you'd like to label. With the email opened, click on the label icon top menu just below the search bar. Select the label you'd like to add to your email.

Option 3:
First, click on the checkbox of the email you'd like to label. Next, click on the label icon on the top menu below the search bar. Choose the label you'd like to assign to the email.

Note: The top menu will only appear when you select an email.
How to Move Emails to Labels
Email can be moved to labels (i.e., removed from the inbox and thus only having the label assigned) by simply dragging and dropping the emails on the label of your choice in the left-hand menu.

How to Read Emails Associated with a Label
You can see all emails associated with a label by clicking on a label.

Managing Your Labels
As you become more comfortable with Gmail, you'll note how easy it is to manage your labels. Gmail's use of the 3 vertical buttons gives users the option to create sublabels, change label names, and remove labels.
How to Create Sublabels
Sublabels are labels created under labels. They are, in essence, like sub-folders for labels.
To create a Sublabel, left-click on the three vertical dots of a label.

Next, click Add sublabel. Give your label a name and click the Create button.

Changing Labels to Sublabels
Gmail also makes it easy to quickly change your label hierarchy. If you'd like to nest an already created label under another, click on the 3 vertical dots and then click on Edit.

Next, click on the Nest label under the checkbox, select the label you'd like to nest your selected label under, and click Save.

Changing Label Names
You can also make updates to your labels. To change the name of a label, left-click on the 3 vertical dots and then on Edit.

Removing Labels
Need to remove a label? Start by left-clicking on the three vertical dots. Next, click on Remove label.

Color Coding Your Labels
Color-coding your labels can make managing emails simpler. When applied, you're able to quickly spot, reply and manage emails according to priority.
To add color to your labels, left-click on the three vertical dots of your label. Next, click on Label color and click on your color of choice.

Hiding and Showing Labels
Hiding and showing labels is a feature designed to help maintain a cleaner message list (left-hand menu in Gmail). When you hide labels, Gmail will not show labels hidden in the left-hand menu along with all other labels. Showing a label makes it visible.
To hide or show labels, click on the three vertical dots of the label concerned and click on Hide or Show under the In message list heading.

Using Filters
Filters can also be used along with labels to streamline email management. Filters are designed to help you automatically assign emails to certain labels.
There are two ways to create a filter that assigns labels to new emails.
Option 1:
Click on the checkbox of the email for which you'd like to create a filter. Next, click on the three vertical dots on the top menu.

With the email selected, you will be presented with the option to search for all emails that meet one or all of the following criteria:
- The same sender's email address
- A specific subject line
- Include or exclude certain words
- A certain size
- Include or exclude attachments
Once you've decided on your filter criteria, click Create filter. Next, select the Apply the label checkbox, choose your label from the list provided, and then click the Create filter button.

Option 2:
To create your filter, click on the gear icon located in the top right-hand corner of your Gmail account.

Next, click on Filters and Blocked Addresses. From this tab, click on Create a new filter.

Create the criteria for your email filter and click on the Create a filter button.

Next, select the Apply the label checkbox, choose your label from the list provided, and click on the Create filter button.

Gmail Labels can be a little confusing at a glance. They come with a set of features that can seem almost hard to grasp, but once you know how they work and how to use them, you'll be able to put them to task in your inbox. They'll help you create and maintain a clean and structured inbox, making it easier to manage your emails as efficiently as possible.
